Wednesday, May 4, 2022

  Evaluation 


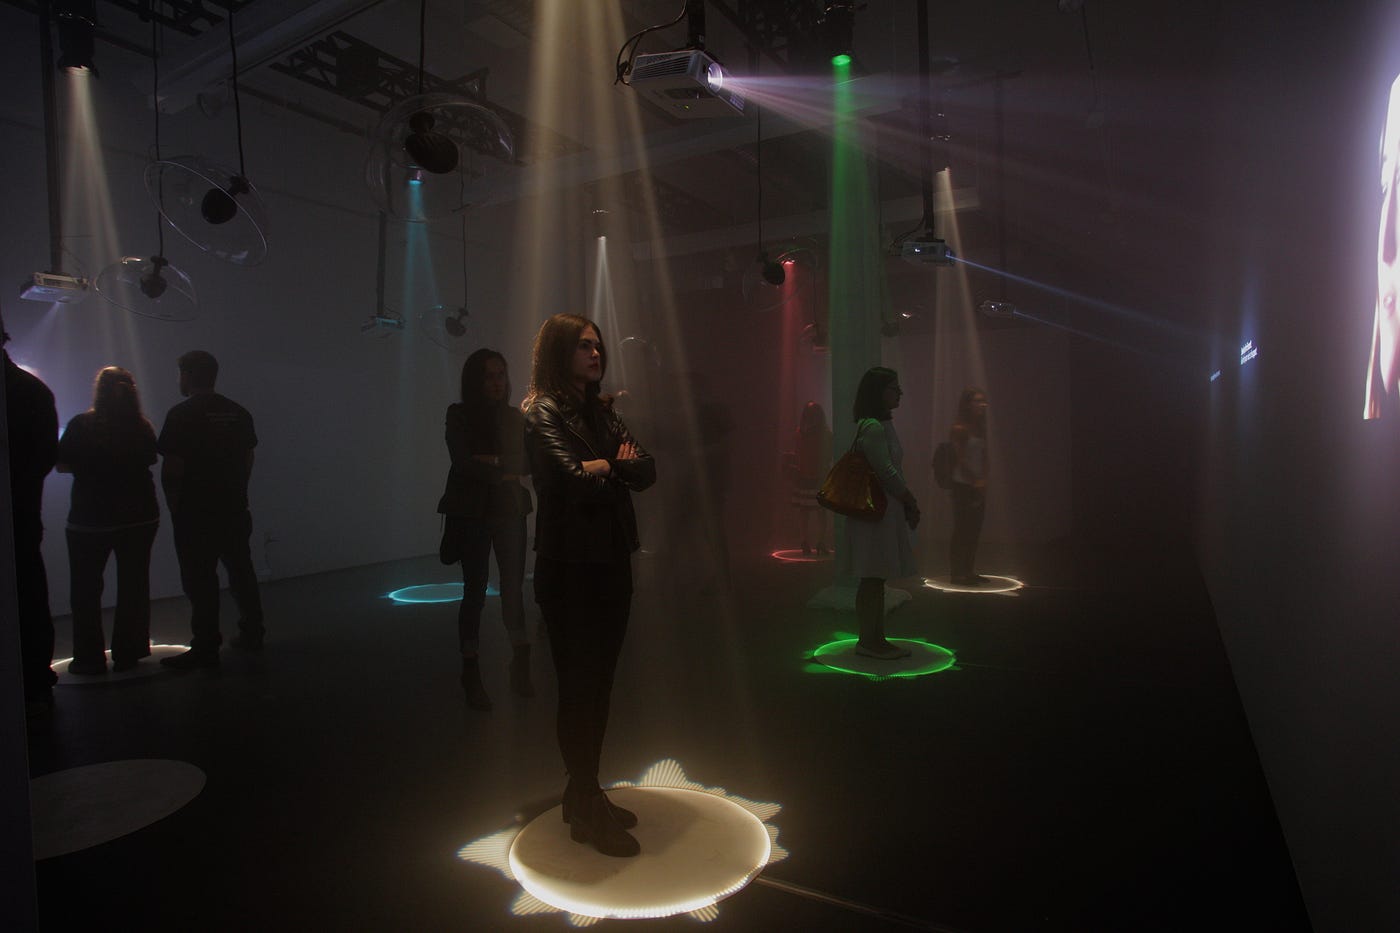
My degree Project ‘478’ is an installation I have purposely, made for viewers to be gradually distracted from their present anxious thoughts and feelings, as mentioned before I would prefer to have my audience be adults since they may be coming in after a stressful working day. I have created an environment, with soft moving sounds generated from the spinning disk and the wind chimes working alongside each other and swirly fluorescent colours that luminate the chimes as well. I do hope for the viewers to feel immersed. I also have the playful furry push buttons that could awaken the audience’s childlike nature’s and encourage them to further explore the art around; and if children are around too it is also inclusive for them to view. The name of my artwork is ‘478’ to give recognition to a famous breathing method used to regulate levels of high stress (Lin et al Kunze, 2020). I did not want to place too much detail in the name in the hopes that people are intrigued and ask questions about the name and in turn I would relay suggestive knowledge on the subject; this could aid making the show more talkative and in hand more interactive. Moreover, I hope my indirect approach does have a positive impact towards the viewers, this indirect approach as mentioned in my design proposal was also inspired from Commandeur and Starmach’s work on their vending machine installation, which in the end was intended to push more positive reinforcement for the local’s mental health (Commandeur et al Starmach, 2018). I have distributed my artwork online on YouTube alongside a tutorial with step-by-step instructions on how to create the installation, I will also have a physical exhibition and I will just need to consider my risks on my risk assessment form to make sure I create little to no hazards for the safety of everyone. Since I have mixed media to assemble.

 Overall, this project was very challenging for me, I did not experiment a lot with Arduinos prior to this project, but nevertheless I was motivated to create something interactive in a newer medium, I did initially plan on using conductive paint as a touch sensor but that failed, although I do wish to further practice with conductive paint for future projects since learning the process was fun and educative. I eventually, moved on to work with motors and I’ve also learnt more how to align code properly and understand why different sections like ‘functions and headers are so important.

 Even though I had a rough beginning, If I remain consistent and keep experimenting and learning from others in the same field of interest, I will create some great further projects in the future.


1)      Lin, Kunze , 2020 AromaCue - A Scent Toolkit To Cope with Stress using the 4-7-8 Breathing Method

2)      Commandeur , S 2020 Commandeur,Elizabeth. Starmach, Mark: Intangible Goods. 2018.Sydney


My final outcome,


The link below shows a tutorial of my process as I finished the installation by creating a spinning disk using a servo motor and arduino which spins the wind chime continuously.

https://youtu.be/BcIwfSHgwqs 


I did some more playing around of lights , I bought a few different types of LED's and experimented how they dispersed light in different fabrics and materials,

overall I preferred how the glass dome illuminated the blue light, which I created by placing fabric inside and I stitched the rest of the lights around the painting.

Sunday, May 1, 2022


 SAATCHI gallery visit

I recently went to the saatchi gallery over the Easter holidays and saw this unstallation by

Anthony James named 'Square Roots,


I loved how the light was illuminated and the use of squares as a symbol. It was a confined but great piece of artwork, even my younger brother was interacting around it a lot and It inspired me to make something that can evoke that same reaction.

Thursday, April 28, 2022


 Since I did say I want to create a calming environment , I thought placing a wind chime indoors would be interesting. So I did some research and discovered online a similar attempt using an arduino to move a wind chime in the absence of great wind.

https://www.youtube.com/watch?v=Hs_0LAAL6Rs&t=498s

House of Hacks ,2014. Hanging Wind Chimes Indoors - A simple Arduino project


Thursday, April 7, 2022

 Halfway point regulation


Unfortunately, halfway through the project, I begun having difficulties with the relay, and as a result, I had to change most of my plan for the project.

Therefore, I will be using push LED's instead of conductive paint and will begin experimenting with the Arduino in a different way.

Alternatively I could use this method below with the paint although, I may not have enough time to assemble everything together.


The extra components needed are a 1kOhm resistor and a 0.01uF capacitor.  The circuit is powered by a single 9V battery, connected at the ground and 9V pins.

Thursday, March 24, 2022


 From my last tutorial -needs expanding


It has been advised that I perhaps gather the A0 size medium, with plans on the arrangements of the 3D object. 

I later bought a canvas with estimated A0 measurements. Moreover, I have started making stockings and creating 3D elements on top, I have chosen materials that allow liquid to sink through easily like cotton, since I want the paint to sink through.

Also the canvas allows me to stitch wool inside more easily.

I plan on getting more permeable materials and mould more shapes with them.


Saturday, March 12, 2022


From my last two tutorials, I have decided to incorporate the touchable textures on the actual artefact instead of just below/around it.


This will make the board even more engaging for the viewer and it will make it 3D as these elements can be touched. Moreover, I now plan to make a large board where the electrical paint touches upon these 3D surfaces so when touched they each generate a light response.


I need to decided which elements I will use for the board and the 3D elements. I could use mount board, paper mashe , cardboard etc. 


Prototype 


I created a prototype with my A2 board , I first painted on it with conductive paint , and the flicker still worked. Afterwards, I created a 3D figure representing a flower. I  used a lot of cotton buds which I stuck together then I painted them with oil paint for a smooth consistency.


I then applied conductive paint in the middle of the flower and placed the wire right there.


Although now I feel as though one it would be better to place the wire from behind the board so it is not visible to the viewer in a strong way.


Creating a reaction in the arduino ,


I have followed 'Aatik's lab'  instructions on making a conductive paint light switch.


I bought the components, the 5v relay ,arduino  uno , wires , led and the 5v power stick. I connected the wires from the Arduino to their assigned places in the relay and then on my laptop I downloaded the touch sensor code placed it into ide , although I had difficulties placing the libraries at first.


So I watched some more tutorial videos on how to properly export library’s into the arduino ide software and learnt that there were about 3 good methods.


After this I exported the code into my arduino uno and then connected the wire pin on the number 6, position on the arduino onto my sheet of paper that had conductive paint.


I realised that everyone I now touched the paint there would be a flicker on one of the arduino lights , and I tested that again and again getting the same reaction.


Now my next thing is to attach led successfully into the relay , the ones I used I did not sufficiently attach them so I need to learn how to do that better.


Friday, February 25, 2022

 I had another tutorial,

where it was discussed that I needed to formulate a more proper working circuit proving that the light bulb could in fact be triggered by touch.


Wednesday, February 23, 2022

A0 BOARD IN THE CENTER


Space and elements

How to build an ideal sensory rooms and which senses should be prioritized?


After reading the article from James ward-sinclair I learnt that sensory areas should be somewhere that cannot be destroyed, but they can also take up any environment and do not necesarily need to be too extravagent. As long as they do the job of stimulating the senses in a positive way thats what mostly matters.((Ward-Sinclair, 2022)

It might be a great idea to maybe have a test run to see how effective the room is, and possibly invite people annoymously and ask for what can be improved. I could lay out a quiz without names needed.Depending on the feedback maybe if the light in certain areas is irritating I could maniopulate that design, and perhaps if some colours are not contrasting greatly and arent visiblt I could also make some alterations.

I could introduce other senses like smell and sound perhaps in a subtle way that does not threaten the viewers away.


Ways of introducing senses:

For my project I will focus on the senses, sight smell and touch. I have chosen a few since I don't think I have enough time to properly centre each sense.

-I could use flowers with lovely fragrence smells, although I may not use actual flowers because of the potential risk of an allergic reaction, I will therefore use substitues like diffusers. Although, I will have to make sure the diffusers are not positioned directly towards heat since the essential oils used within them can be flammable.


According to a research from "Gardener know how" , Roses are the number one most pleasant smelling flowers. they are quoted as being the "most trendy and the most popular pleasant smelling flowers in the world".(Pleasant Smelling Flowers: the top 20 according to experts., 2022)   Using this information I may use rose scent around my installation, or perhaps jasmine as it was the second favourite.

With sight,I could use some bright colours and continue using the light bulbs with the ardunio . Since I am using conductive paint which is black, any bright ajacent colours would really stand out. Although, I need to be careful not to make things extremely bright nor dim as well.


1-Ward-Sinclair, J., 2022. Autism Sensory Room Ideas: Building a Safe Space for Autistic People. [online] Autistic & Unapologetic. Available at: <https://autisticandunapologetic.com/2020/04/12/autism-sensory-room-ideas-building-a-safe-space-for-autistic-people/#room> [Accessed 23 February 2022].


2-Gardener Know How. 2022. Pleasant Smelling Flowers: the top 20 according to experts.. [online] Available at: <https://gardenerknowhow.com/pleasant-smelling-flowers#:~:text=%20Pleasant%20Smelling%20Flowers%3A%20the%20top%2020%20according,tropical%20regions%20of%20South...%205%20Sampaguita%20More%20> [Accessed 23 February 2022].


Images:

(https://www.regannursery.com), R., 2022. Bare Root Roses - 1,000+ Bare Root Roses Available - Regan Nursery. [online] Regannursery.com. Available at: <https://www.regannursery.com/> [Accessed 23 February 2022].

DEGAS (artist research)

I did some artist research for more inspiration for my designing. I looked at Edgar Degas a french artist during the impressionism period in the 19th century; I mainly looked over his 'Spanish Dance' sculptures. I enjoyed how poise they appeared and even though they are still , they evoked movement. I like the first one below especially as you can imagine the dancer is just about to commence into a series of complex moves just from how she is initially positioned.


Monday, February 21, 2022

 Sensory research ,

Autism Sensory Room


Ward-Sinclair expresses in his article how within the general public many of us have attempted to try to sit with our thoughts and without warning are interrupted for example by  "the world’s noisiest eater". he continues to state how "In any other circumstance, you turn the other cheek, but something about that exact sound makes it impossible to ignore", to emphasise how overpowering some external stimuli can be for humans.

This is a more occurring feeling amongst autistic people as moderating stimuli can be very overbearing and may cause powerful discomfort. (Ward-Sinclair 2020)

Sensory rooms were designed to temporarily deflect uncomfortable stimuli, they were firstly introduced mainly in the 1970s but they were called Snoezelens.

-IMAGES


This is a installed sensory room with a bubble tube, I like how there is a great contrast of the neon coloured lights against the dark background, and that the objects are inviting for people to touch.

Bibliography

1-Ward-Sinclair, J., 2022. Autism Sensory Room Ideas: Building a Safe Space for Autistic People. [online] Autistic & Unapologetic. Available at: <https://autisticandunapologetic.com/2020/04/12/autism-sensory-room-ideas-building-a-safe-space-for-autistic-people/> [Accessed 21 February 2022].

2-Sensory Technology Ltd. 2022. Sensory Rooms Gallery | Sensory Room Ideas. [online] Available at: <https://www.senteq.co.uk/sensory-room/sensory-rooms-gallery/> [Accessed 23 February 2022].


Thursday, February 17, 2022

 Feb tutorial with Mike.

From my tutorial with Mike, we discussed that I need to have a deeper focus on what people will visually see.

Additionally, since I am making therapeutic art I need to really practice what that may look like and what I want it all to really mean.

Another great point was too focus on things or textures that are generally therapeutic amongst many people outside of myself, and to perhaps look at sensory playgrounds designed ,for example, autistic children and people, since they are deeply concentrated in providing a mentally comforting experiences.


 circuit screenshot

With a help of a colleague this circuit map was created on simulink to reflect how I would like my components to align together.

They are all connected to one power source, and the 'touch point' where the artefact would be touched is a trigger point. This is represented by the small squares, and there are 6 of them as I may want 6 touchable points that trigger a reaction to the Arduino and bulbs.

s

Wednesday, January 26, 2022


 I used 3, 220ohm resistors , with three LED's and wires connected from the arduino board from the ground, and 13v,12v, and 11v connected to the breadboard adjacent to each Led and resistor. 

Although,  for two resistors I may need to replace them to make the circuit flow throughout more succinctly.

Saturday, January 22, 2022


I wanted to focus on educative and therapeutic art,


from my research I found a beautiful installation for schrizophenia  in New York, where they also worked with light but also film.(Sharon Howard-Butler and Brit Till.2017)

Overall this is beautiful as well as educative.


Bloom, A Traveling Art Installation About OcdI also found this installation for OCD by Madeline Walker.2018

Friday, January 14, 2022

I recently had a tutorial, where I was given more resources as to places and books with more knowledge, and from the diagram above, I decided to have at least 3 or more touch points and therefore I would require more than one Arduino since they can all individually run one programme at a time. (Monk Simon:Programming Arduino: Getting Started with Sketches.2011)
 

Sunday, January 9, 2022


I watched a few YouTube videos (listed below),

and I learnt about conductive paint and how it can be used into circuits with touch sensors.

Electricity-Conducting Paint Lets You Paint Switches On Walls. Tech Insider.2018

https://www.youtube.com/watch?v=kd75H9HbYTM

Conductive Paint Touch Switch || Arduino Capacitive Touch Sensor || Part 2. Aatik's lab.2018

https://www.youtube.com/watch?v=L6j3VxvNV5c

I begun drawing diagrams figuring out how I would want to arrange my installation.
+


Thursday, January 6, 2022


After some more research, I realised I want to explore more with making interactive physical spaces.

So I chose to work with Arduino's.


I have not worked with them for like 2 years so I needed to refresh my memory.


I revised common electrical components , and their purpose.